Update 5/24/19: Added Link to completed project below along with Script Package.
Perhaps it is my own bias, but over the past year or so, I’ve seen an influx of new and seasoned developers taking a crack at building procedurally generated planets. It’s no surprise really, as there have been a few recent games that handle this very well and I can’t praise enough the results some of these teams have achieved, especially with relatively few members.
No Man’s Sky and Astroneer and hot in the public eye, and powerhouse projects like Universe Sandbox have been at this forever. No wonder you’re interested. Vast variety seemingly just at your fingertips. Such is the power of math and clever code.
As anyone who’s tangled with this problem (and there are many, big and small), we know that the devil is in the details. While it’s simple to make something that looks nice, it’s more difficult to make something interesting (as others have sufficiently covered).
Of course, we still have to start somewhere! In this post, my goal is to introduce you to the basic concept of how others and myself begin generating worlds. In future posts we will build on this system to add some complexity as we go along.
Some Housekeeping
Since this is the first post, I wanted to comment on what tech I’ll be using.
My experience is primarily Unity3D, so that’s what we’ll be using for this series. Specifically Unity 2019.1.3, so we can leverage some experimental features in future installments. Please feel free to download the project for this tutorial and take a look.
Download Script Package
Download Zipped Project
Let’s Get Started!
Here’s a high level overview of what steps we’ll take today.
- Create a base mesh
- Subdivide the shape a few times
- Turn subdivided shape into sphere
- Add some noisy height and color
Not too bad when you break it down like that.

1: Create base mesh
Let’s start with a handful of setup code. We’ll create a class named Planet and set up a few arrays to hold our mesh data while we manipulate it. Lets add a few setup functions here as well.
using System.Collections;
using System.Collections.Generic;
using UnityEngine;

[RequireComponent(typeof(MeshFilter))]
public class Planet : MonoBehaviour
{
    //Used to build a new planet on the fly
    public bool rebuild = false;

    //Local arrays for keeping track of our mesh data
    private Vector3[] m_vertices;
    private int[] m_triangles;
    private Color[] m_colors;

    //Mesh filter we'll use for this planet
    MeshFilter m_meshFilter;

    private void BuildCube()
    {
        //We'll do this next
    }

    public void RebuildPlanet()
    {
        BuildCube();
        RandomColors();
    }

    private void RandomColors()
    {
        //Later
    }

    private void Awake()
    {
        m_meshFilter = GetComponent<MeshFilter>();
    }

    private void Start()
    {
        RebuildPlanet();
    }

    /// <summary>
    /// Check 'Rebuild' in Editor to regenerate planet
    /// </summary>
    private void Update()
    {
        if(rebuild)
        {
            RebuildPlanet();
            rebuild = false;
        }
    }
}
Next we’ve got to actually build our cube. It will be 1 unit in size with center at zero. If we wanted, we could just spawn a primitive, but I like building my own shapes. Let’s start off our method by setting up our arrays.
private void BuildCube()
{
    //6 Faces, 2 Tris per face, 3 Verts per Tri
    m_triangles = new int[6 * 2 * 3];
    m_vertices = new Vector3[8];
}
Next lets take a look at the vertices of our cube.

Easy enough to define those vertices in code
...
//Bottom of cube
m_verts[0] = new Vector3(-.5f, -.5f, -.5f);
m_verts[1] = new Vector3(-.5f, -.5f, .5f);
m_verts[2] = new Vector3( .5f, -.5f, .5f);
m_verts[3] = new Vector3( .5f, -.5f, -.5f);

//Top of cube
m_verts[4] = new Vector3(-.5f, .5f, -.5f);
m_verts[5] = new Vector3(-.5f, .5f, .5f);
m_verts[6] = new Vector3( .5f, .5f, .5f);
m_verts[7] = new Vector3( .5f, .5f, -.5f);
...
Next we need to define our triangles. In Unity, triangles are defined by index to vertex array, in sets of 3. The order in which we define triangles does matter. This is called Winding Order. We must assign vertices to the triangle array in clockwise fashion to make sure our faces our pointed outward.
In a clockwise winding order, Triangle 0 will be set into the array as 0,4,7 and Triangle one will be set as 0,7,3.

If we look at each face of this cube, and wind each triangle in this same fashion, we can come up with something that looks like this:
//-Z Face
m_triangles[0] = 0;
m_triangles[1] = 4;
m_triangles[2] = 7;

m_triangles[3] = 0;
m_triangles[4] = 7;
m_triangles[5] = 3;

//+Z Face
m_triangles[6] = 2;
m_triangles[7] = 6;
m_triangles[8] = 5;

m_triangles[9] = 2;
m_triangles[10] = 5;
m_triangles[11] = 1;

//-X Face
m_triangles[12] = 1;
m_triangles[13] = 5;
m_triangles[14] = 4;

m_triangles[15] = 1;
m_triangles[16] = 4;
m_triangles[17] = 0;

//+X Face
m_triangles[18] = 3;
m_triangles[19] = 7;
m_triangles[20] = 6;

m_triangles[21] = 3;
m_triangles[22] = 6;
m_triangles[23] = 2;

//-Y Face
m_triangles[24] = 1;
m_triangles[25] = 0;
m_triangles[26] = 3;

m_triangles[27] = 1;
m_triangles[28] = 3;
m_triangles[29] = 2;

//+Y Face
m_triangles[30] = 4;
m_triangles[31] = 5;
m_triangles[32] = 6;

m_triangles[33] = 4;
m_triangles[34] = 6;
m_triangles[35] = 7;
We’re also going to fill out RandomColors()
private void RandomColors()
{
    m_colors = new Color[m_vertices.Length];
    //Now add some random colors
    for (int i = 0; i < m_colors.Length; i++)
    {
        Color color = Color.white;
        color.r = Random.Range(0f, 1f);
        color.g = Random.Range(0f, 1f);
        color.b = Random.Range(0f, 1f);
        m_colors[i] = color;
    }
}
Lastly, we need a function that will take our local vert, tri, and color arrays and make a mesh from them:
public void RebuildPlanet()
{
    BuildCube();
    RandomColors();
    RenderToMesh();
}

private void RenderToMesh()
{
    if(m_meshFilter != null)
    {
        if(m_meshFilter.mesh == null)
        {
            m_meshFilter.mesh = new Mesh();
            m_meshFilter.mesh.MarkDynamic();
        }

        //We're using UInt32 indexing so we can have more than 65k verts/mesh
        //This is not supported in all systems
        m_meshFilter.mesh.indexFormat = UnityEngine.Rendering.IndexFormat.UInt32;
        m_meshFilter.mesh.vertices = m_vertices;
        m_meshFilter.mesh.SetTriangles(m_triangles, 0);
        m_meshFilter.mesh.colors = m_colors;
   }
}
Now we need a simple shader to paint our cube with its vertex colors, and we can put it all together and get a cube!
Shader "Custom/VertexColorUnlit" {
Properties {
}

Category {
    Tags { "Queue"="Geometry" }
    Lighting Off
    BindChannels {
        Bind "Color", color
        Bind "Vertex", vertex
        //Bind "TexCoord", texcoord
    }

    SubShader {
        Pass {
        }
    }
}
}
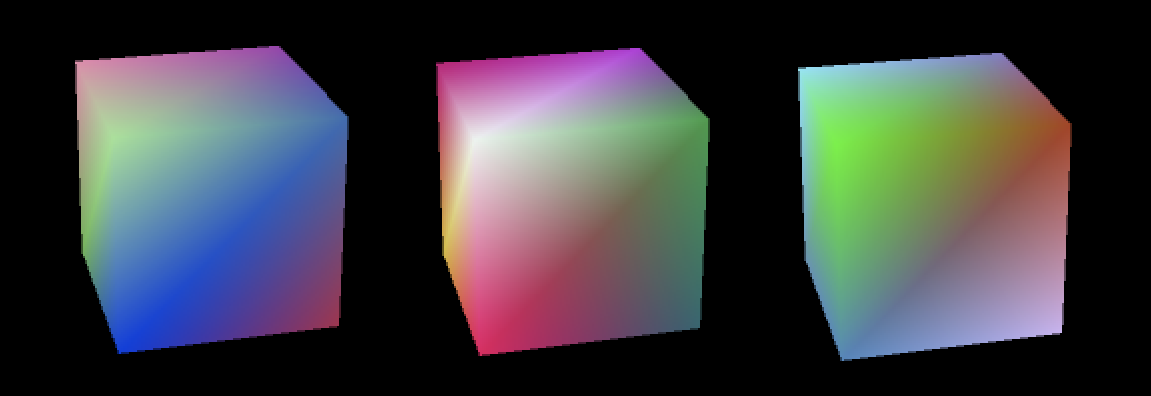
2. SUBDIVIDE SHAPE
Great! We’ve got a shape to build on. In this step we’re going to give ourselves some more vertices to play with. This is effectively increasing the resolution of our mesh, giving us more detail later in the process.
In Short, what we are going to do is take every triangle we’ve generated up to this point. This can be done as simply as dividing each edge into two edges and connecting them to form 4 triangles where there was one.
Note: We will create quite a few duplicate vertices with this method fixing that lies outside our scope here

First we’re going to add a few supporting features to define how many subdivisions we’d like to perform.
...
public bool rebuild = false;

//9 Subdivisions is pushing the bounds of what we want to do on the main thread
//So for now, we'll keep ourselves from locking Unity
[Range(0,9)]
public int subdivisions;

...

public void RebuildPlanet()
{
    BuildCube();

    for (int i = 0; i < subdivisions; i++)
    {
        Subdivide();
    }

    RandomColors();
    RenderToMesh();
}
Now we’ve got to actually perform the subdivision. We’ll iterate over our old array in threes so we can manipulate triangles as a whole.
private void Subdivide()
{
    //For simplicity, we're going to build our new mesh data with an arraylist
    //In high performance systems you'd probably do a lot differently, especially this
    List<Vector3> vNew = new List<Vector3>();
    List<int> tNew = new List<int>();

    //Do this for every triangle (+=3 since we're referencing indices
    for(int i = 0; i < m_triangles.Length; i+= 3)
    {
        //Each original vertex in our original triangle
        Vector3 v1 = m_vertices[m_triangles[i]];
        Vector3 v3 = m_vertices[m_triangles[i + 1]];
        Vector3 v5 = m_vertices[m_triangles[i + 2]];

        //Create one vertex in the center of each edge of our original triangle
        Vector3 v2 = Vector3.Lerp(v1, v3, .5f);
        Vector3 v4 = Vector3.Lerp(v3, v5, .5f);
        Vector3 v6 = Vector3.Lerp(v5, v1, .5f);

        //Add each vertex (old and new) to our new vert list
        int newIndex = vNew.Count;
        vNew.Add(v1);
        vNew.Add(v2);
        vNew.Add(v3);
        vNew.Add(v4);
        vNew.Add(v5);
        vNew.Add(v6);

        //The nice thing about lists is we can make the tris we are creating a little more obvious
        //Yeah, this is for readability rather than performance again, thanks for noticing.
        tNew.AddRange(new int[] { newIndex+0, newIndex + 1, newIndex + 5 });
        tNew.AddRange(new int[] { newIndex + 1, newIndex + 2, newIndex + 3 });
        tNew.AddRange(new int[] { newIndex + 1, newIndex + 3, newIndex + 5 });
        tNew.AddRange(new int[] { newIndex + 5, newIndex + 3, newIndex + 4 });
    }

    //Load up our new mesh data
    m_vertices = vNew.ToArray();
    m_triangles = tNew.ToArray();
}
Great! That’s all we need to to. At this stage, you should be able to generate a number of subdivided cubes, and also have control over the detail. Try different subdivisions and note how performance is impacted as we scale up.

3. Spherify shape
Alright, lots of vertices to play with now! But it still looks like the same old cube, so we’ve got to round it up. All this step involves is moving each vertex radius distance from the center, since every point on a (perfect) sphere is equidistant from the center.
First, we must expose a new variable to define our sphere’s radius. Here we could use realistic planetary scales, but for now, we’ll leave the shape roughly the same size.
...
public bool rebuild = false;

//Our cube ranges from -.5f to .5f, so this is a good starting radius
public float radius = .5f;
...
Now we can add our actual Spherify function.
private void Spherify()
{
    for (int i = 0; i < m_vertices.Length; i++)
    {
        float curDist = Vector3.Distance(m_vertices[i], Vector3.zero);
        m_vertices[i] *= (radius / curDist);
    }
}
Lastly we need to make sure this function is called on planet creation, so we update our RebuildPlanet function.
public void RebuildPlanet()
{
    BuildCube();

    for (int i = 0; i < subdivisions; i++)
    {
       Subdivide();
    }

    Spherify();
    RandomColors();
    RenderToMesh();
}
If we run the code now, our shape begins to converge on a sphere the more verts we allow it to work on. 5 Subdivisions give a decent impression of a sphere for now.

4. HEIGHT AND COLOR
Congratulations! You’ve now got a pretty multicolor sphere. All that’s left is to make it look like a planet. We’re going to take the quickest route there, and many of you can see it coming: Perlin noise.
In future installments we’ll look at ways to improve the look and believability of our planets, but for the moment, we’re going to use a single octave of 2D Perlin noise, which is built right into Mathf. We could look at 3D Perlin noise, but that’s not built into Unity, so we’ll work with this.
First things first, we need a way to map a point in 3D space to a point in 2D space (UV Unwrapping). Fortunately, we’ve already got a decent way of doing this in the real world using Latitude and Longitude. In short, this measures your angle both vertically and horizontally using a known sphere size. We will define a constructor that takes a point and a sphere size and stores the value as latitude and longitude. We will also define a function for translating this to a manageable space (from 0f-1f).
using UnityEngine;

public struct LatLong
{
    public float latitude;
    public float longitude;

    public LatLong(Vector3 point, float sphereSize)
    {
        this.longitude = Mathf.Atan2(point.y, Mathf.Sqrt(point.x * point.x + point.z * point.z));
        this.latitude = Mathf.Atan2(point.x, -point.z);

        this.latitude = Mathf.Rad2Deg * latitude;
        this.longitude = Mathf.Rad2Deg * longitude;
    }

    public Vector2 GetUV()
    {
        Vector2 v = Vector2.zero;
        v.x = Mathf.Lerp(0f, 2f, (latitude + 180f) / 360f);
        v.y = Mathf.Lerp(0f, 1f, (longitude + 90f) / 180f);
        return v;
    }
}
I’m not going to go over the specific mathematics of this conversion as that’s not really in the scope here, rather how to use the results. Note that y is measured from 0-1f because longitude is measured 0-180 degrees, where latitude is measured 0-360 and so we measure that 0-2f.
Next we need to expose a few properties that will let us tweak the rendering of our planet. This includes detail scale of our noise map, height of noise (as a factor of radius), as well as color data.
...
public float radius = .5f;

//Height/Noise mapping settings
public float perlinScale = 20f;
public float seaLevel = .4f;
public float maxHeight = 0.1f;

//Color mapping settings
public Color waterColor = Color.blue;
public Gradient landGradient;
Now we need to once again hook into our BuildPlanet function. This is our final step for this method.
Note: RandomColors() will no longer be necessary at this step since we’ll be sampling new color data.
public void RebuildPlanet()
{
    BuildCube();

    for (int i = 0; i < subdivisions; i++)
    {
        Subdivide();
    }

    Spherify();

    //Unnecessary step, but leaving in as it's in the tutorial.
    //RandomColors();

    HeightMap();
    RenderToMesh();
}
Great! Now the magic. All in one swoop, we will sample our noise, assign height value, sample and assign color data. Here we make it a planet! Comments inline to step us through.
private void HeightMap()
{
    if (m_colors == null || m_colors.Length != m_vertices.Length)
    {
        m_colors = new Color[m_vertices.Length];
    }

    //Assign a random offset to our noise for some variety
    Vector2 offset = new Vector2(Random.Range(0, 100000), Random.Range(0, 100000));

    for (int i = 0; i < m_vertices.Length; i++)
    {
        //Get Latitude and Longitude of the sphere in degrees
        LatLong latLong = new LatLong(m_vertices[i], radius);

        //Map Latlong to 0-1 values
        Vector2 uv = latLong.GetUV();

        //Sample the perlin noise
        float t = Mathf.PerlinNoise((offset.x + uv.x) * perlinScale, (offset.y + uv.y) * perlinScale);

        //Find the new distance from center for this variable
        float newDist = radius + Mathf.Lerp(0f, maxHeight, t);

        Color c = Color.Lerp(Color.black, Color.white, t);
        if (t <= seaLevel)
        {
            //If this vertex is at sea level, ensure it is level with all other water
            //Also modulate this distance against our maxHeight (as a factor of planetary radius)
            newDist = radius + (seaLevel * maxHeight * radius);
            c = waterColor;
        }
        else
        {
            //If this vertex is above sea level, map our height (between sea level and 1f) to a gradient
            float landLevel = (t - seaLevel) / (1f - seaLevel);
            c = landGradient.Evaluate(landLevel);
        }

        //Assign our data
        m_vertices[i] *= newDist / radius;
        m_colors[i] = c;
    }
}
One last thing to this whole mess. You may note above that I’ve added a random offset to our noise data. This is so we’re not always generating the same data. We’ve got to add a few more minor things to initialize the random system, and ensure we can regenerate the same planets if we want to in the future. In this way, you could design multiple planets and ensure you can load them again.
private void Awake()
{
    m_meshFilter = GetComponent<MeshFilter>();

    //If we've set any other value, we don't have to generate a new one
    //Otherwise generate something sufficient for a little variety
    if (seed <= 0)
        seed = (int)System.DateTime.Today.TimeOfDay.TotalSeconds;

    Debug.Log("Planet Seed: " + seed);

    //Initialize our random states
    Random.InitState(seed);
}

...

private void Update()
{
    if(rebuild)
    {
        //Generate a new seed from current seed
        //#RebelWithoutACause
        //You could opt to skip this part so you can mess with settings on a single planet
        seed = Random.Range(0, 10000000);
        Random.InitState(seed);
        Debug.Log("Planet Seed: " + seed);

        RebuildPlanet();
        rebuild = false;
    }
}
There we have it, a rudimentary planet builder with a handful of settings to make some different looking worlds.

Next installment, we will look at a few options for improving on this very basic generator. You’re probably already seeing the cracks in this method: warping around the poles, a seam where our map projection meets, shapes that seem real, but aren’t very interesting.
Coming Soon: Procedural Planets 2: Planet Harder
Thank you for reading, I hope you found this tutorial helpful. Please let me know if it shows up on /r/ProgrammingHorror. If you want to follow the project, consider checking out my social media.


One thought on “Procedural Planets 1: Something To Work with”